Creating a Neutral Density Filter with The GIMP
| Before | After |
|---|---|
 |
 |
In this tutorial I’ll show you how to create a “digital” neutral density (ND) filter for your image in The GIMP.
 |
||
Seasoned photographers are familiar with the split-ND and graduated-ND filters (example at right). These filters have the effect of reducing the exposure over part of the image being taken in either a graduated or abruptly graduated (split) way.
A typical example of the use of a split ND filter would be if you are taking a shot of a sunset. You align the dark part of the filter with the sky and the clear part with the foreground; the split occurs roughly at the horizon. Used properly, you can meter and expose for the foreground details, while preserving highlight detail in the sky and clouds.
You could of course use a ND filter with a digital camera. This tutorial is for when you don’t have that filter, or can’t use a filter. This procedure works best with an image that does not have the highlights completely burned out or the shadow detail completely reduced to black; there has to be a reasonable amount of detail to be rescued. It also is mainly suited to images that need exposure adjustment in a graduated linear or split linear fashion (e.g. sky meets horizon). If the scene you want to shoot has too much dynamic range for your camera, or requires a complex (i.e. non-linear) density mask, you’re better off using the exposure blending technique or the contrast masking technique.
Giving credit where credit is due: I did not come up with this method. I adapted it for The GIMP from a Photoshop tutorial on the luminous-landscape.com web site (great photography web site BTW; I recommend it).
About Layers and Layer Masks
The technique is a classic example of using layers and layer masks. If you don’t know what these are here is an extremely short introduction to the basic concepts. Refer to the figures below when following the text.
All images in the GIMP can be composed of one or more layers. When an image is first loaded, it occupies the default Background layer, as shown in Figure 1 below. You can add additional layers on top of the background layer. These upper layers can contain anything you want. Frequently you want to create upper layers that are different versions of the same image. This is most easily accomplished by duplicating a layer, such as in Figure 2 where I duplicated the Background layer.
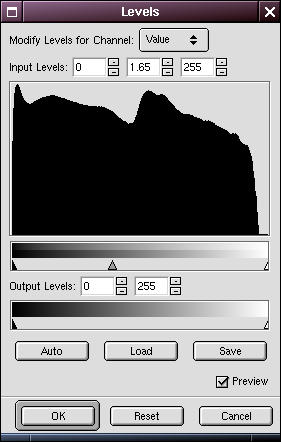
Each layer can be manipulated independently of the others. In Figure 3, I used a Levels adjustment on the upper layer to lighten it.
Now the good stuff. Layers can be combined in various ways to produce a single image, as if you were looking through the top layer down to the bottom. One way this can be done is by reducing the opacity of part or all of the upper layers. The opacity of a layer can be changed from 100% (opaque) to 0% (completely transparent) or anywhere in between.
It is also possible to make parts of the same layer have different opacities (or levels of transparency, if you prefer to think of it that way). Again, there are many ways to do this, but one of the most flexible ways is with a layer mask. A layer mask can be added to a layer and becomes one of its attributes. It is a grayscale image that is the same size as the layer. The layer mask has the effect of varying the opacity of each pixel in the the layer according to each corresponding pixel value in the mask. A black pixel in the mask makes the corresponding pixel in the layer completely transparent, a white pixel makes it completely opaque, and any value in between is interpreted as a percentage of opacity between these two extremes.
I’m sure you are beginning to see the possibilities. In Figure 4 we see a useful layer mask created for the upper layer in this image. Once the layer mask is added, it is filled with a gradient. It has the effect of carefully blending the upper layer image from completely opaque to totally transparent, as shown in Figure 5.
Note the real beauty of this approach: our original image is untouched on the background layer; the lightened image on layer 2 did not require any painstaking selection to only affect the required areas; and the layer mask (in this case) was trivial to create. For maximum flexibility you can save this image in the GIMP’s native XCF format and it will retain all of the layered structure. This allows you to easily go back in and make additional adjustments, safe in the knowledge that your original unmodified image is conveniently available on the Background layer if you ever need to redo the upper layer or the layer mask. When you are ready to export the image to one of the more common image formats such as TIFF or JPEG it will flatten the image as shown in Figure 6.
I hope this gives you a basic foothold to grasp the concepts of layers and layer masks. Layer masks are just one of the many attributes that a layer can have. Other attributes such as the blend mode also affect how a layer combines with the other layers below it. A little further research into how layers work will pay off big rewards in your GIMP image editing abilities.
 Figure 1. Original image on Background layer. |
 Figure 2. Background layer is duplicated, giving us two layers. |
 Figure 3. The upper layer is adjusted with Levels or Curves. |
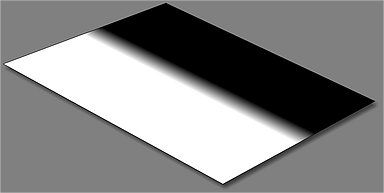 Figure 4. A layer mask is added to the upper layer and filled with a linear gradient. |
 Figure 5. The layer mask makes the upper layer transparent where the layer mask is black, and smoothly blending to opaque where it is white. |
 Figure 6. When exported, the image is flattened. |
Now, on to the specific instructions for creating “digital” split ND filters in the GIMP!
The Procedure
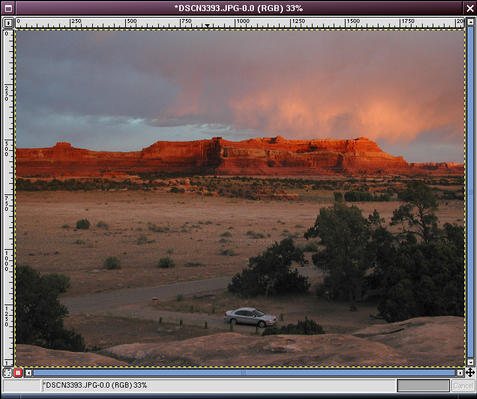
| Here is the original example image, loaded into The GIMP.It is a nice image, but a little too dark for my taste in the foreground. I want to lighten everything reaching back to the base of the cliffs, but leave the wonderful cliff and sky unchanged. |  |
||
| To see just how much detail is available, I can do a LAB decompose (Image/Mode/Decompose) and look at the Luminance channel [Note: LAB decompose was not in the stock version of the GIMP that I am working with (v1.2.3); I had to download it from the GIMP plug-in registry and compile it myself).Judging from the original image, you might think that any detail in those black trees in the foreground might be gone, but look look at all the detail in the L channel that’s waiting to be brought out!
We don’t need this image for any of the rest of what we’re doing here (it’s just for information), so close it whenever you want. |
|
||
| Open the Layers dialog and make sure that the original image is listed in the drop-down box. Right-click on the Background layer and select Duplicate (there is also a button for this in the bottom button bar of the Layers dialog ( |
 |
||
| Now double-click on the duplicate layer and rename the new layer “ND Filter”. This step is not strictly necessary, but it is helpful to prevent confusion about what is on each layer, especially if you add some additional layers for other editing purposes, or more importantly, if you save the file with layers and open it six months later. |
|
||
| In the Layers dialog, select the ND Filter layer. Go to the image window and perform any editing you want to enhance highlight or shadow detail. Usually this means using Levels or Curves (I won’t go into that here; there are lots of tutorials on the web about that).You can use selection and masking if you want, but generally it’s not necessary. Don’t worry about the “good” part of the image; let it go too dark or too light. Concentrate on the area that needs improvement.
In this case, I’ve used levels to lighten the whole image: the dark foreground is now about right. |
|
||
| In the Layers dialog, right-click on the ND Filter layer and select “Add Layer Mask”.In the Add Mask Options dialog, select white (Full Opacity) and click OK. |
|
||
| Go up to the main GIMP toolbox and select white for the foreground and black for the background colors. The GIMP normally starts with black as the default foreground color and white as the default background; you can switch them by clicking the little switching arrow. |
|
||
| Click the “eye” next to the Background layer in the Layers dialog off; this will help you see the split of the gradient you are going to add.Now select the gradient fill tool ( If you didn’t get the split at the right place just draw another line; the new gradient fill will replace the old. The gradient fill effects the transparency of the layer mask: white is opaque, black is transparent, and anything in between is some degree of translucent. You want the ND Filter layer to become transparent just at the boundary of the “good” part of the original image (in this case, the cliffs and sky). |
|
||
| Click the “eye” next to the Background layer in the Layers dialog back on. Behold: your image with the filter applied. |
|
||
| One last thing that you may decide to do is to increase the saturation of the upper layer a bit; shadow areas in particular tend to be a little flat after they are pulled up.Click on the image icon in the ND Filter layer in the Layers dialog to make sure that the image will be adjusted and not the layer mask. Then bring up the Hue-Saturation dialog (Image/Colors/Hue-Saturation). Experiment with bumping up the saturation a bit and click OK. I find that I prefer to adjust the saturation with the layer mask in place, rather than just after adjusting levels, since I only want to see the effect on the shadows; it’s too confusing to see the highlights affected. |
|
||
| We’re done! Click the “eye” next to the ND Filter layer in the Layers dialog on and off to quickly view the effects with and without the ND filter.The top one on the right is the original. The bottom image is with the filter. |
|
||
| You’ll have to flatten the image if you are saving it to a typical image format like TIFF or JPEG (but not if you are saving to the GIMP’s native XCF format). To do that, right-click on the image and select Layers/Flatten Image. | 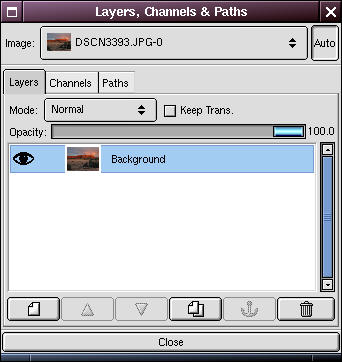 |


Tips
- The length of the line that you draw with the gradient fill tool determines how “graduated” the ND filter will be. If you want a “split” filter, draw a short line; if you want a smooth, graduated filter, draw a long line. You will need to experiment to get a feel for it.
- Double-click on the gradient fill tool to see the options available when you fill your layer mask. In particular, you may want to experiment with the Opacity and/or Mode parameters of the fill. You can also choose gradient fills other than Linear to get odd ND filter patterns (e.g. Radial, etc.).
- You can change the transparency of the ND Filter layer using the Opacity slider in the Layers dialog. This reduces the effect of the filter.
- You can experiment with the layer mode of the ND Filter layer by choosing modes other than Normal (e.g. Multiply), in the “Mode” drop-down box in the Layers dialog.
- I find this technique works generally best with rescuing shadows, rather than highlights. This is generally because it seems to be easier to burn out the highlights either in taking the image, or scanning it. There is an old adage about transparency film that confirms this: “expose for the highlights”. Of course if you are using a real split ND filter you’d expose for the shadow detail and use the dark part of the filter to capture the highlights.
Other Examples
The original image. |
With a nd filter as described above. |
The original image. |
With digital nd filter. |
The original image. |
With a 2-directional digital nd filter (& perspective correction). |
Further Reading
- Fred Miranda’s tutorial using this same technique in Photoshop.
- Blend modes: How do Adobe Photoshop, Micrografx PicturePublisher and Pegtop XFader blend layers? (great reference)


[…] Using directions from this tutorial, I tried to imitate a neutral density filter. It’s my first serious attempt at correcting a photograph like this, but I’m happy with the result. I plan to play with it some more, but I wanted to post this initial before/after for posterity. […]
Pingback by Post-production with GIMP « Starla Stitcher: a creativity blog — May 17, 2010 @ 8:48 pm